

FileRun — это веб-приложение для обмена файлами с открытым исходным кодом для операционной системы на базе Linux. Оно очень похоже на Google Drive, iCloud и DropBox и позволяет пользователям обмениваться файлами и синхронизировать их через интернет. Доступ к нему возможен через мобильное приложение, WebDAV и веб-браузер. Он позволяет разместить собственное файлообменное решение в облаке и получить доступ ко всем файлам в любом месте через безопасное облачное хранилище.
В этом посте мы расскажем, как установить FileRun с Apache и Let’s Encrypt SSL на Ubuntu 22.04.
Установка Apache, MariaDB и PHP
FileRun написан на PHP и использует MariaDB в качестве бэкенда базы данных. Поэтому вам необходимо установить на ваш сервер пакеты Apache, MariaDB, PHP и другие. Сначала установите пакеты Apache и MariaDB с помощью следующей команды:
apt-get install apache2 mariadb-server mariadb-client
После установки обоих пакетов вам нужно будет установить PHP версии php7.2-php7.4 на ваш сервер. Однако Ubuntu 22.04 поставляется с версией PHP 8.1 в репозитории по умолчанию. Поэтому вам нужно будет добавить репозиторий PHP Ondrej на ваш сервер.
Сначала установите все необходимые зависимости с помощью следующей команды:
apt install software-properties-common ca-certificates lsb-release apt-transport-https -y
Затем добавьте репозиторий PHP с помощью следующей команды:
add-apt-repository ppa:ondrej/php
Затем обновите кэш репозитория и установите PHP с другими необходимыми расширениями с помощью следующей команды:
apt update
apt install php7.4 libapache2-mod-php7.4 imagemagick ffmpeg php7.4-imagick php7.4-mysql php7.4-fpm php7.4-common php7.4-gd php7.4-json php7.4-curl php7.4-zip php7.4-xml php7.4-mbstring php7.4-bz2 php7.4-intl unzip -y
После установки всех пакетов вам также потребуется установить загрузчик IonCube.
Сначала загрузите загрузчик IonCube с помощью следующей команды:
wget https://downloads.ioncube.com/loader_downloads/ioncube_loaders_lin_x86-64.tar.gz
Затем распакуйте загруженный файл с помощью следующей команды:
tar -xzf ioncube_loaders_lin_x86-64.tar.gz -C /usr/lib/php
Далее создайте файл конфигурации ioncube и укажите путь к источнику IonCube:
nano /etc/php/7.4/apache2/conf.d/00-ioncube.ini
Добавьте следующую строку:
zend_extension = /usr/lib/php/ioncube/ioncube_loader_lin_7.4.so
Сохраните и закройте файл, затем создайте файл конфигурации PHP для FileRun:
nano /etc/php/7.4/apache2/conf.d/filerun.ini
Добавьте следующие настройки:
expose_php = Off
error_reporting = E_ALL & ~E_NOTICE
display_errors = Off
display_startup_errors = Off
log_errors = On
ignore_repeated_errors = Off
allow_url_fopen = On
allow_url_include = Off
variables_order = "GPCS"
allow_webdav_methods = On
memory_limit = 128M
max_execution_time = 300
output_buffering = Off
output_handler = ""
zlib.output_compression = Off
zlib.output_handler = ""
safe_mode = Off
register_globals = Off
magic_quotes_gpc = Off
upload_max_filesize = 20M
post_max_size = 20M
enable_dl = Off
disable_functions = ""
disable_classes = ""
session.save_handler = files
session.use_cookies = 1
session.use_only_cookies = 1
session.auto_start = 0
session.cookie_lifetime = 0
session.cookie_httponly = 1
date.timezone = "UTC"
Сохраните и закройте файл, а затем перезапустите службу Apache, чтобы применить изменения:
systemctl reload apache2
Создание базы данных для FileRun
Сначала защитите установку MariaDB и установите пароль root с помощью следующей команды:
mysql_secure_installation
Ответьте на все вопросы, как показано ниже:
Enter current password for root (enter for none):  PRESS ENTER
Set root password? [Y/n] Y
New password:
Re-enter new password:
Remove anonymous users? [Y/n] Y
Disallow root login remotely? [Y/n] Y
Remove test database and access to it? [Y/n]  Y
Reload privilege tables now? [Y/n] Y
Затем войдите в оболочку MariaDB, выполнив следующую команду:
mysql -u root -p
После входа в систему создайте базу данных и пользователя с помощью следующей команды:
MariaDB [(none)]> CREATE DATABASE filerun;
MariaDB [(none)]> CREATE USER 'filerun'@'localhost' IDENTIFIED BY 'password';
Затем предоставьте все привилегии базе данных FileRun с помощью следующей команды:
MariaDB [(none)]> GRANT ALL PRIVILEGES ON filerun.* TO 'filerun'@'localhost';
Затем снимите привилегии и выйдите из MariaDB с помощью следующей команды:
MariaDB [(none)]> FLUSH PRIVILEGES;
MariaDB [(none)]> EXIT;
После этого можно переходить к следующему шагу.
Скачать FileRun
Сначала загрузите последнюю версию FileRun с их официального сайта, используя следующую команду:
wget -O FileRun.zip https://filerun.com/download-latest
После загрузки FileRun распакуйте загруженный файл с помощью следующей команды:
unzip FileRun.zip -d /var/www/html/filerun/
Затем установите правильные разрешения и права собственности с помощью следующей команды:
chown -R www-data:www-data /var/www/html/filerun
chmod -R 755 /var/www/html/filerun
После этого можно переходить к следующему шагу.
Создание виртуального хоста Apache для FileRun
Далее вам нужно будет создать файл конфигурации виртуального хоста Apache для FileRun. Вы можете создать его с помощью следующей команды:
nano /etc/apache2/sites-available/filerun.conf
Добавьте следующие строки:
        ServerName filerun.example.com

        DocumentRoot /var/www/html/filerun


                Options Indexes FollowSymLinks
                AllowOverride All
                Require all granted


        ErrorLog ${APACHE_LOG_DIR}/filerun.error.log
        CustomLog ${APACHE_LOG_DIR}/filerun.access.log combined
Сохраните и закройте файл, затем активируйте виртуальный хост Apache и включите модуль перезаписи Apache с помощью следующей команды:
a2ensite filerun.conf
a2enmod rewrite
Затем перезапустите службу Apache, чтобы применить изменения:
systemctl restart apache2
Вы также можете проверить состояние Apache с помощью следующей команды:
systemctl status apache2
Вы должны увидеть следующий результат:
? apache2.service - The Apache HTTP Server
     Loaded: loaded (/lib/systemd/system/apache2.service; enabled; vendor preset: enabled)
     Active: active (running) since Sat 2022-08-06 09:26:00 UTC; 7s ago
       Docs: https://httpd.apache.org/docs/2.4/
    Process: 21189 ExecStart=/usr/sbin/apachectl start (code=exited, status=0/SUCCESS)
   Main PID: 21193 (apache2)
      Tasks: 6 (limit: 2242)
     Memory: 14.6M
        CPU: 112ms
     CGroup: /system.slice/apache2.service
             ??21193 /usr/sbin/apache2 -k start
             ??21194 /usr/sbin/apache2 -k start
             ??21195 /usr/sbin/apache2 -k start
             ??21196 /usr/sbin/apache2 -k start
             ??21197 /usr/sbin/apache2 -k start
             ??21198 /usr/sbin/apache2 -k start

Aug 06 09:26:00 ubuntu2204 systemd[1]: Starting The Apache HTTP Server...
После этого можно переходить к следующему шагу.
Доступ к веб-интерфейсу FileRun
Теперь откройте веб-браузер и зайдите в веб-интерфейс FileRun, используя URL-адрес http://filerun.example.com. Вы будете перенаправлены на следующую страницу:
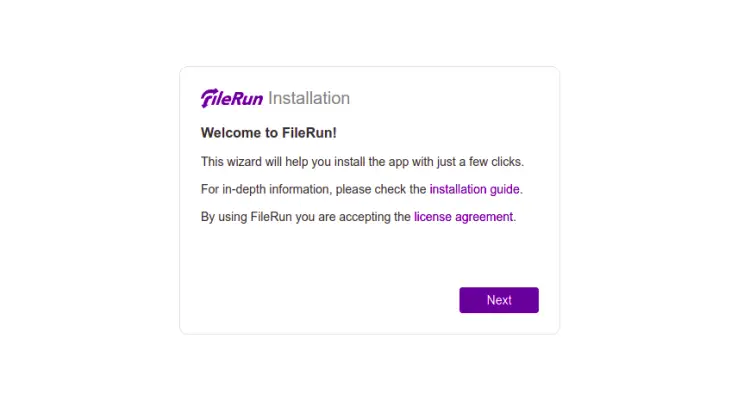
Нажмите на кнопку Следующий Вы увидите страницу проверки требований к серверу:
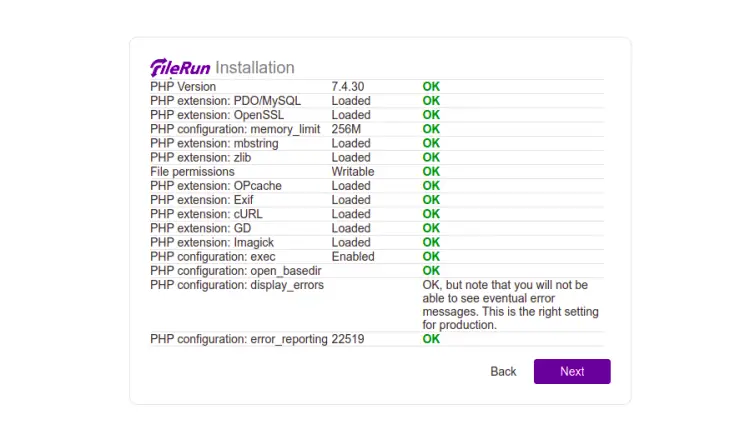
Нажмите на кнопку Следующий кнопку. Вы увидите страницу конфигурации базы данных:
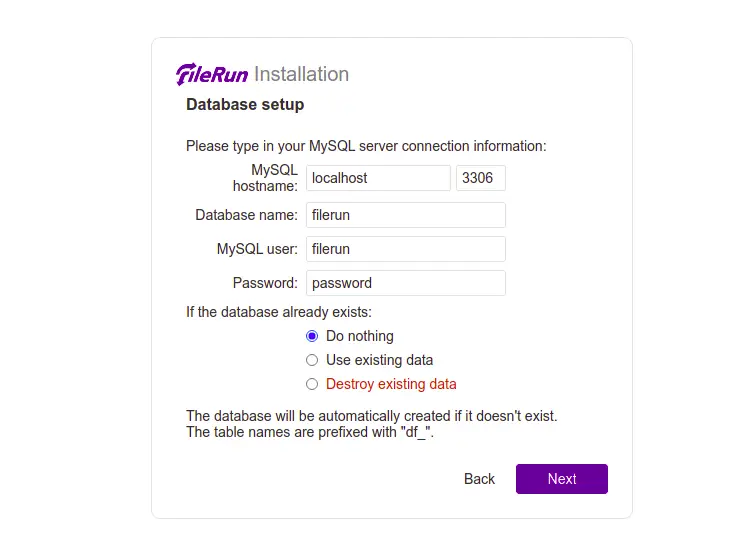
Нажмите на кнопку Следующий кнопку. После завершения установки вы увидите следующую страницу:
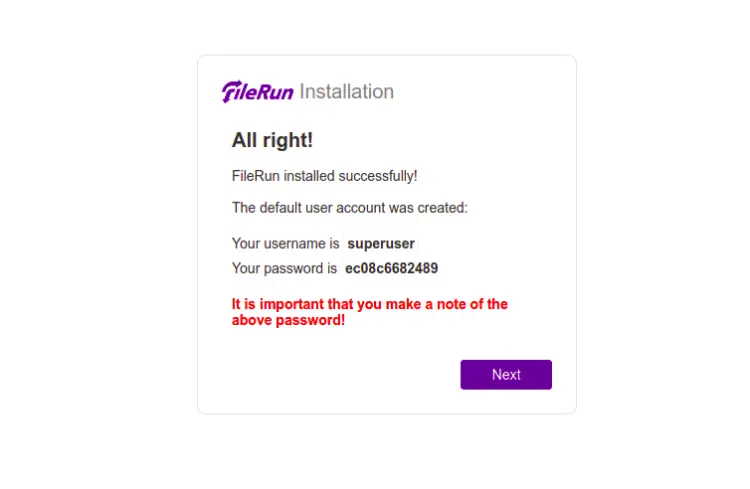
Нажмите на кнопку Следующий кнопку. Вы увидите страницу входа в систему FileRun:
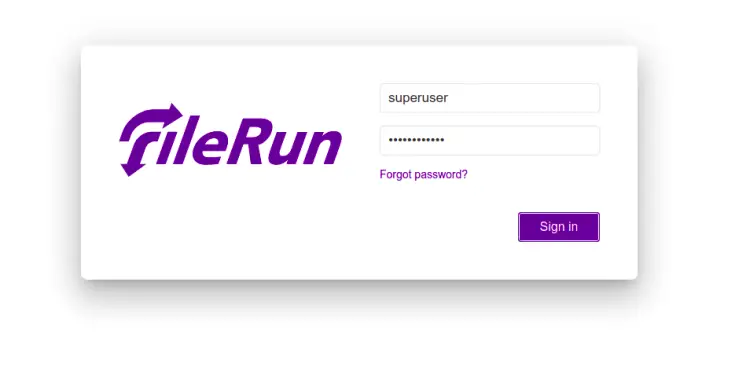
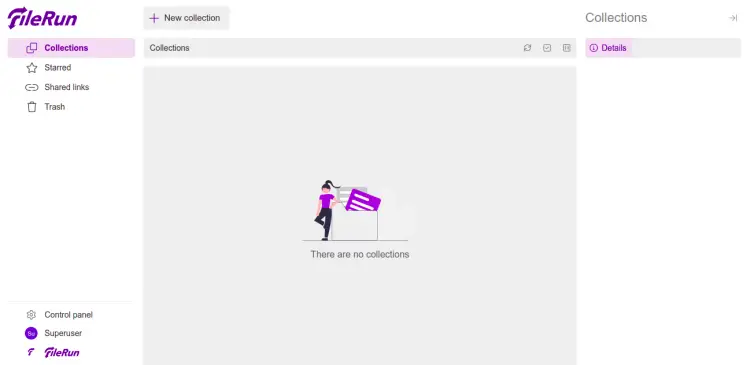
Введите свое имя пользователя admin, пароль и нажмите на кнопку Войти кнопку. Вы увидите панель FileRun на следующей странице:
Защита FileRun с помощью Let’s Encrypt SSL
Также рекомендуется защитить ваш сайт с помощью Let’s Encrypt SSL. Сначала вам нужно установить клиент Certbot на ваш сервер. Вы можете установить его с помощью следующей команды:
apt-get install python3-certbot-apache -y
После установки Certbot выполните следующую команду, чтобы защитить свой сайт с помощью Let’s Encrypt SSL:
certbot --apache -d filerun.example.com
Вам будет предложено указать свою электронную почту и принять условия предоставления услуг, как показано ниже:
Saving debug log to /var/log/letsencrypt/letsencrypt.log
Plugins selected: Authenticator standalone, Installer None
Enter email address (used for urgent renewal and security notices) (Enter 'c' to
cancel): [email protected]

- - - - - - - - - - - - - - - - - - - - - - - - - - - - - - - - - - - - - - - -
Please read the Terms of Service at
https://letsencrypt.org/documents/LE-SA-v1.2-November-15-2017.pdf. You must
agree in order to register with the ACME server at
https://acme-v02.api.letsencrypt.org/directory
- - - - - - - - - - - - - - - - - - - - - - - - - - - - - - - - - - - - - - - -
(A)gree/(C)ancel: A

- - - - - - - - - - - - - - - - - - - - - - - - - - - - - - - - - - - - - - - -
Would you be willing to share your email address with the Electronic Frontier
Foundation, a founding partner of the Let's Encrypt project and the non-profit
organization that develops Certbot? We'd like to send you email about our work
encrypting the web, EFF news, campaigns, and ways to support digital freedom.
- - - - - - - - - - - - - - - - - - - - - - - - - - - - - - - - - - - - - - - -
(Y)es/(N)o: Y
Plugins selected: Authenticator apache, Installer apache
Obtaining a new certificate
Performing the following challenges:
http-01 challenge for filerun.example.com
Enabled Apache rewrite module
Waiting for verification...
Cleaning up challenges
Created an SSL vhost at /etc/apache2/sites-available/filerun-le-ssl.conf
Enabled Apache socache_shmcb module
Enabled Apache ssl module
Deploying Certificate to VirtualHost /etc/apache2/sites-available/filerun-le-ssl.conf
Enabling available site: /etc/apache2/sites-available/filerun-le-ssl.conf
Next, select whether or not to redirect HTTP traffic to HTTPS as shown below:
Пожалуйста, выберите, нужно ли перенаправлять HTTP-трафик на HTTPS, удаляя доступ к HTTP.
- - - - - - - - - - - - - - - - - - - - - - - - - - - - - - - - - - - - - - - -
1: No redirect - Make no further changes to the webserver configuration.
2: Redirect - Make all requests redirect to secure HTTPS access. Choose this for
new sites, or if you're confident your site works on HTTPS. You can undo this
change by editing your web server's configuration.
- - - - - - - - - - - - - - - - - - - - - - - - - - - - - - - - - - - - - - - -
Select the appropriate number [1-2] then [enter] (press 'c' to cancel): 2
Введите 2 и нажмите Enter, чтобы установить Let’s Encrypt SSL для вашего сайта:
Enabled Apache rewrite module
Redirecting vhost in /etc/apache2/sites-enabled/filerun.conf to ssl vhost in /etc/apache2/sites-available/filerun-le-ssl.conf

- - - - - - - - - - - - - - - - - - - - - - - - - - - - - - - - - - - - - - - -
Congratulations! You have successfully enabled https://filerun.example.com

You should test your configuration at:
https://www.ssllabs.com/ssltest/analyze.html?d=filerun.example.com
- - - - - - - - - - - - - - - - - - - - - - - - - - - - - - - - - - - - - - - -

IMPORTANT NOTES:
 - Congratulations! Your certificate and chain have been saved at:
   /etc/letsencrypt/live/filerun.example.com/fullchain.pem
   Your key file has been saved at:
   /etc/letsencrypt/live/filerun.example.com/privkey.pem
   Your cert will expire on 2022-4-29. To obtain a new or tweaked
   version of this certificate in the future, simply run certbot again
   with the "certonly" option. To non-interactively renew *all* of
   your certificates, run "certbot renew"
 - If you like Certbot, please consider supporting our work by:

   Donating to ISRG / Let's Encrypt:   https://letsencrypt.org/donate
   Donating to EFF:                    https://eff.org/donate-le
Заключение
Поздравляем! Вы успешно установили FileRun с Apache и Let’s Encrypt SSL на Ubuntu 22.04. Теперь вы можете разместить свой собственный сервер FileRun в облаке и начать делиться своими файлами, музыкой и фотографиями с друзьями и близкими.